tel
검색
확인
취소
good display
현재 위치:
메인 페이지
/
/
ePaper 리프레시 모드 소개

관련정보

RELATED INFORMATION

연락처

CONTACT US

ePaper 리프레시 모드 소개

  • 분류 :뉴스센터
  • 작성자 :
  • 출처 :
  • 등록시간 :2022-02-22
  • 방문수 :358

【개요 설명】

ePaper 리프레시 모드 소개

【개요 설명】

  • 분류 :뉴스센터
  • 작성자 :
  • 출처 :
  • 등록시간 :2022-02-22
  • 방문수 :358
상세정보

There are usually three kinds of update mode of E-paper display:
 

Update Mode Full Update Patial Update Fast Update

Supported colors

Three-colors (BWR) and monochrome (BW)

Monochrome (BW)

Monochrome (BW)

Image data upload

Full screen image
New image buffer with all 0x00 buffer

Partial window image
Previous image buffer and new image buffer

Full screen image
Previous image buffer and new image buffer

Panel update

Whole screen
Flashing effect

Partial window
Fast mode

Whole screen
Fast mode

Image quality

Optimal quality

Possible ghosting

Possible ghosting

Upload image speed

Slow

Fast

Slow

Update image speed

Slow

Fast

Fast

Overall speed

Slow

Fastest

Faster

Tip: So why don't we use partial or fast updates all the time? Why bother with all the flickering? The optical performance of a full update is way better. You get better contrast and a well defined image. If you use partial or fast updates too often, you'll get the so called "ghosting" effect. Ghosting looks like old display content is burned in and shows through in the new image. You can get rid of ghosting by doing another full update, therefore, our recommendation is to do one full update after five or six partial or fast updates.


Test Object: 2.9inch E-Paper Display
Note: We provide the results and parameters as reference for you and please contact us if you want to learn more.
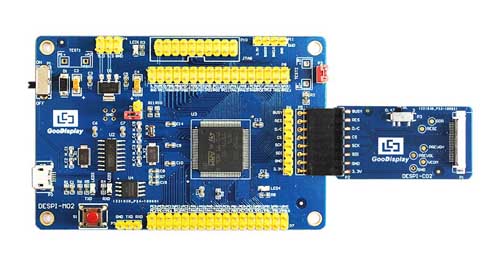
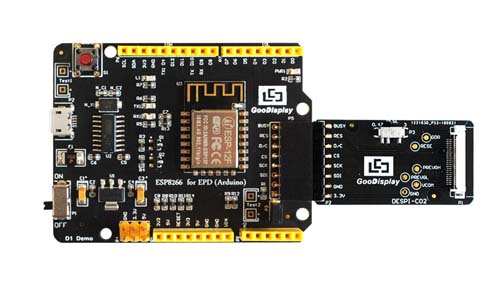
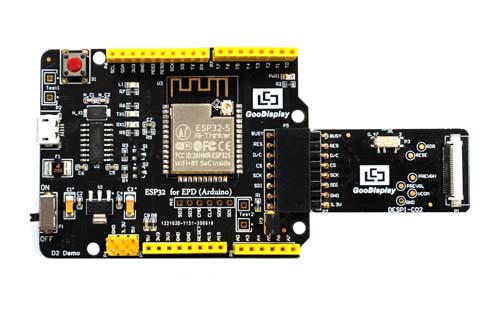


Platforms

Hardware Connection and IO Settings

Demonstration of Updates

Refresh Time and Current

Comparison Among Codes


PLATFORMS

Goodisplay has multiple development plans for driving EPDs. Here we mainly introduce STM32, EPS32 and ESP8266 to you. Users can also drive EPDs via Raspberry Pi/ Raspberry Pi Pico, which you can learn more on our WEBSITE.


STM32


STM32 based on Cortx-M, has 32-bit microcontroller, supports broad 32-bit applications including high performance, real time, processing digital signal and low-power, low-voltage operation and is a perfectly integrated and easy development kit. There is a broad product line based on STM32 for its industial-standardized core, plenty of tools and softwares to support it. It is an ideal choice for many products. Its MCU, STM32F103VET6 and has related drivers that can be transplanted onto users' development plan to drive EPDs.

ESP8266


For easy understanding, we may apprehend the ESP8266 as a MCU with WiFi function, which we can use another MCU to communicate following the same instruction to implement operations. ESP8266 is a serial port WiFi module, with an integrated MCU to realize serial communication. It is easy to learn and small enough for embedded development. It designed for mobile deveces, smart wearables and IoT products. Relyed on multiple patents, it has realized ultra-low power consumption and has power-saving mode for all kinds of related scenarios.

ESP32


Likewise,we may also apprehend the ESP32 as a MCU with WiFi+BT function, which we can use another MCU to communicate following the same instruction to implement operations. Compared with ESP8266, it has BT function and a faster and lower-power CPU.It is easy to learn and small enough for embedded development. It designed for mobile deveces, smart wearables and IoT products. Relyed on multiple patents, it has realized ultra-low power consumption and has power-saving mode for all kinds of related scenarios.


DEMONSTRATION OF UPDATES

IO settings have already been done previously so that users only need to connect the adaptor board to the main board.
In order to realize different updates users only need to revise the software.
The following section will detail the IO settings:

  CONNECTION   IO SETTINGS
 
Connecting STM32F103VET6
EPD STM32
VCC 3.3V
GND GND
BUSY PE13
RES PE14
D/C PE15
CS PD8
SCK PD9
SDI PD10
  //CS-->PD8     SCK-->PD9     SDO--->PD10
GPIO_InitStructure.GPIO_Pin = GPIO_Pin_8|GPIO_Pin_9|GPIO_Pin_10; 
GPIO_InitStructure.GPIO_Mode = GPIO_Mode_Out_PP;
GPIO_InitStructure.GPIO_Speed = GPIO_Speed_2MHz;
GPIO_Init(GPIOD, &GPIO_InitStructure);
 
 // D/C--->PE15    RES-->PE14
GPIO_InitStructure.GPIO_Pin = GPIO_Pin_14|GPIO_Pin_15;
GPIO_InitStructure.GPIO_Mode = GPIO_Mode_Out_PP;
GPIO_InitStructure.GPIO_Speed = GPIO_Speed_2MHz;
GPIO_Init(GPIOE, &GPIO_InitStructure);
 
 // BUSY--->PE13
GPIO_InitStructure.GPIO_Pin = GPIO_Pin_13;
GPIO_InitStructure.GPIO_Mode = GPIO_Mode_IPU;
GPIO_InitStructure.GPIO_Speed = GPIO_Speed_2MHz;
GPIO_Init(GPIOE, &GPIO_InitStructure);


Connecting ESP8266
EPD STM32
VCC 3.3V
GND GND
BUSY D0
RES D1
D/C D2
CS D5
SCK D6
SDI D7
 

//IO settings
int BUSY_Pin = D0;
int RES_Pin = D1;
int DC_Pin = D2;
int CS_Pin = D5;
int SCK_Pin = D6;
int SDI_Pin = D7;


Connecting ESP32
EPD STM32
VCC 3.3V
GND GND
BUSY A14
RES A15
D/C A16
CS A17
SCK A18
SDI A19
  //IO settings
int BUSY_Pin = A14;
int RES_Pin = A15;
int DC_Pin = A16;
int CS_Pin = A17;
int SCK_Pin = A18;
int SDI_Pin = A19;


REFRESH TIME AND CURRENT

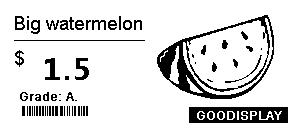
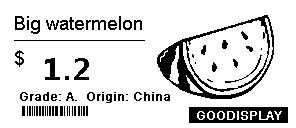
Take GDEW029T5D as an example,we can use the methods below to change the price.


gImage_1


gImage_2


gImage_3


Monochrome E-paper Display(GDEW029T5D)

1. Full Update Mode

2. Partial Update Mode

3. Fast Update Mode


Tri-color E-paper Display(GDEH029Z13)

1. Full Update Mode

2. Partial Update Mode
Note: The partial update here is only when black and white are displayed, not real partial update.


REFRESH TIME AND CURRENT

The following results are the representative values of the same EPD(GDEW029T5D) under the same conditions.

 
Type Mode Time(s) Current(mA)
GDEW029T5D (B/W) Full update 3s 2.6mA
Partial update 0.3s 2.5mA
Fast update 0.8s 2.1mA
GDEH029Z13(B/W/R) Full update 13s 4mA
Partial update 0.3s 2.8mA


COMPARISON AMONG CODES

GDEW029T5D(B/W)

Main Function

Full update

Partial update

Fast update

EPD_init();
PIC_display(gImage_1);
EPD_sleep();

EPD_init();
PIC_display(gImage_2);
EPD_sleep();

EPD_init();
PIC_display(gImage_3);
EPD_sleep();

EPD_init();
EPD_partial_display(0,0,gImage_1,gImage_1,296,128,0);
EPD_partial_display(0,0,gImage_1,gImage_2,296,128,1);
EPD_partial_display(0,0,gImage_2,gImage_3,296,128,1);
EPD_sleep();

EPD_init();
EPD_full_display(gImage_1,gImage_1,0);
EPD_sleep();

EPD_init();
EPD_full_display(gImage_1,gImage_2,1);
EPD_deep_sleep();

EPD_init();
EPD_full_display(gImage_2,gImage_3,1);
EPD_sleep();

Note: gImage_1,gImage_2,gImage_3 are 296*128, gImage_22g and Image_33 are 152*128.

Initialization

Full mode

Partial mode

Fast mode

EPD_W21_Init();

EPD_W21_WriteCMD(0x04);
lcd_chkstatus();

EPD_W21_WriteCMD(0x00);
EPD_W21_WriteDATA(0x1f);

EPD_W21_WriteCMD(0x61);
EPD_W21_WriteDATA (0x80);
EPD_W21_WriteDATA (0x01);
EPD_W21_WriteDATA (0x28);

EPD_W21_WriteCMD(0X50);
EPD_W21_WriteDATA(0x97);

EPD_W21_Init();
EPD_W21_WriteCMD(0x01);
EPD_W21_WriteDATA (0x03);
EPD_W21_WriteDATA (0x00);
EPD_W21_WriteDATA (0x2b); EPD_W21_WriteDATA (0x2b);
EPD_W21_WriteDATA (0x13);

EPD_W21_WriteCMD(0x06);
EPD_W21_WriteDATA (0x17);

EPD_W21_WriteCMD(0x04);
lcd_chkstatus();

EPD_W21_WriteCMD(0x00);
EPD_W21_WriteDATA(0xbf);

EPD_W21_WriteCMD(0x30);
EPD_W21_WriteDATA (0x3c);

EPD_W21_WriteCMD(0x61);
EPD_W21_WriteDATA(0x80);
EPD_W21_WriteDATA(0x01);
EPD_W21_WriteDATA(0x28);

EPD_W21_WriteCMD(0x82);
EPD_W21_WriteDATA (0x10);

EPD_W21_WriteCMD(0X50);
EPD_W21_WriteDATA(0x97);

EPD_W21_Init();
EPD_W21_WriteCMD(0x01);
EPD_W21_WriteDATA (0x03);
EPD_W21_WriteDATA (0x00);
EPD_W21_WriteDATA (0x2b);
EPD_W21_WriteDATA (0x03);

EPD_W21_WriteCMD(0x06);
EPD_W21_WriteDATA (0x17);

EPD_W21_WriteCMD(0x04);
lcd_chkstatus();

EPD_W21_WriteCMD(0x00);
EPD_W21_WriteDATA(0xbf);

EPD_W21_WriteCMD(0x30);
EPD_W21_WriteDATA (0x3c);

EPD_W21_WriteCMD(0x61);
EPD_W21_WriteDATA(0x80);
EPD_W21_WriteDATA(0x01);
EPD_W21_WriteDATA(0x28);

EPD_W21_WriteCMD(0x82);
EPD_W21_WriteDATA (0x12);

EPD_W21_WriteCMD(0X50);
EPD_W21_WriteDATA(0x97);

Note: In different methods of EPD update, Function EPD_W21_Init()is the same as Function lcd_chkstatus()

Note: In different methods of EPD update, display functions are different and please refer to the detailed code in the program while the sleep function is the same.


GDHW029Z13(B/W/R)

Main Function

Full update

Partial update

EPD_init();
PIC_display(gImage_BW1, gImage_R1);
EPD_sleep();

EPD_init_LUT();
EPD_partial_display_Color(8,16,gImage_1,gImage_1,200,24,0);
EPD_partial_display_Color(8,16,gImage_2,gImage_2,200,24,0);
EPD_sleep();

Initialization

EPD_W21_Init();

EPD_W21_WriteCMD(0x04);
lcd_chkstatus();

EPD_W21_WriteCMD(0x00);
EPD_W21_WriteDATA(0x0f);

EPD_W21_WriteCMD(0x61);
EPD_W21_WriteDATA (0x80);
EPD_W21_WriteDATA (0x01);
EPD_W21_WriteDATA (0x28);

EPD_W21_WriteCMD(0X50);
EPD_W21_WriteDATA(0x77);

EPD_W21_Init();
EPD_W21_WriteCMD(0x01);
EPD_W21_WriteDATA(0x03);
EPD_W21_WriteDATA(0x00);
EPD_W21_WriteDATA(0x2b);
EPD_W21_WriteDATA(0x13);

EPD_W21_WriteCMD(0x06);
EPD_W21_WriteDATA(0x17);

EPD_W21_WriteCMD(0x04);
lcd_chkstatus();

EPD_W21_WriteCMD(0x00);
EPD_W21_WriteDATA(0xbf);

EPD_W21_WriteCMD(0x30);
EPD_W21_WriteDATA(0x3c);

EPD_W21_WriteCMD(0x61);
EPD_W21_WriteDATA(0x68);
EPD_W21_WriteDATA(0x00);
EPD_W21_WriteDATA(0xd4);

EPD_W21_WriteCMD(0x82);
EPD_W21_WriteDATA(0x12);

EPD_W21_WriteCMD(0X50);
EPD_W21_WriteDATA(0x97);
lut1();

Note: In different methods of EPD update, Function EPD_W21_Init()is the same as Function lcd_chkstatus()

Note: In different methods of EPD update, display functions are different and please refer to the detailed code in the program while the sleep function is the same

QR코드를 스캔하여 휴대폰으로 보기

관련 정보

이 페이지를 표시할 수 없습니다
우선 웹사이트 백엔드에서 데이터 기록을 추가하세요.

관련 상품

이 페이지를 표시할 수 없습니다
우선 웹사이트 백엔드에서 데이터 기록을 추가하세요.